For the creative developers out there seeking a festive project that leverages your coding skills, let’s build a digital Holiday Greeting Card that you can customize, add your own photo, and instantly download. We’ll be using some cutting-edge web technologies to make this happen, and along the way, you’ll learn about graphics generation, several cool packages, and some neat Vue 3 tricks.
What we are going to be building
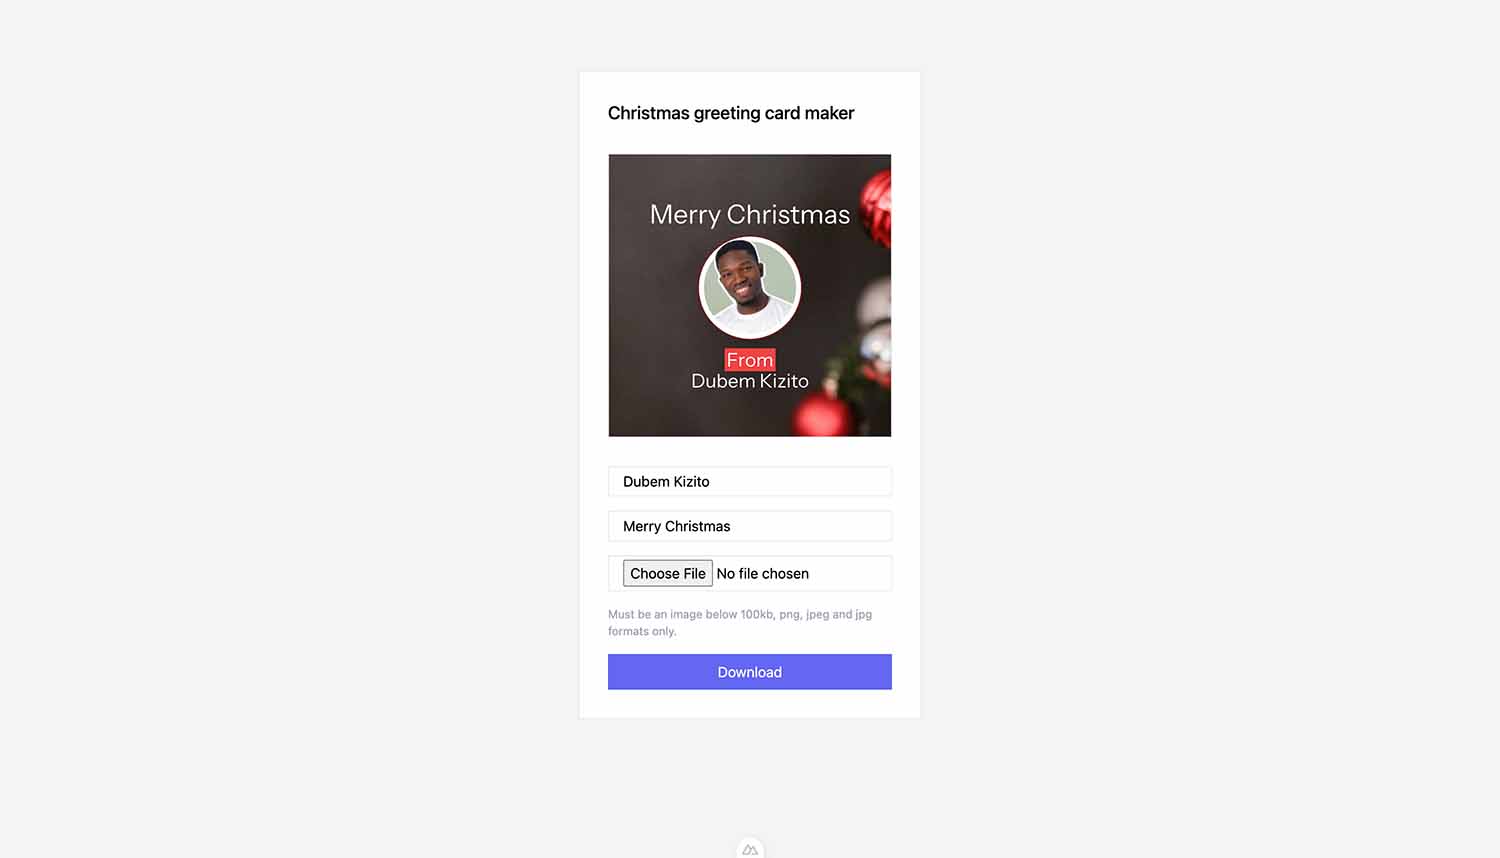
Screenshot of Holiday Greeting Card Maker interface
By the end of this tutorial, you’ll have:
- A fully functional web app for creating personalized holiday cards
- Hands-on experience with Vue 3, Nuxt, and some powerful rendering libraries
- An understanding of how to dynamically generate graphics in the browser
Project Initialization
We’ll use Nuxt 3 as our framework because it provides a robust, batteries-included setup for Vue applications. Open your terminal and let’s create our project by running the commands below:
npx nuxi init christmas-card-maker
cd christmas-card-maker
yarn install
Why Nuxt? It gives us a solid foundation with built-in routing, easy module integration, and an overall easy setup. Perfect for our greeting card maker!
Installing Our Toolkit
Now, we’ll add the libraries that will make our card generation magic happen. Run the following commands on your terminal:
yarn add @vue/server-renderer @vueuse/core nuxt satori satori-html
yarn add -D @nuxtjs/tailwindcss
Let me break down why we’re choosing each of these:
@vue/server-renderer: Allows us to render Vue components & props as HTML strings - crucial for our SVG generationsatori: Converts our HTML and CSS string into beautiful SVG graphicsSatori HTML: A helper library for rendering HTML content compatible with Satori@vueuse/core: Provides helpful utilities like local storage, watchDebounce and many more@nuxtjs/tailwindcss: Gives us rapid styling capabilities
Configuring our Project
Let’s update our nuxt.config.ts to set up our development environment:
📄 nuxt.config.ts
export default defineNuxtConfig({
  ssr: false,
  devtools: { enabled: true },
  modules: ["@nuxtjs/tailwindcss"],
});
We’re disabling server-side rendering for this client-side app and enabling Tailwind CSS module. This gives us a lightweight, responsive setup perfect for our greeting card maker.
Coding our Card Maker
Now that we’re all setup, let’s dive into creating our Holiday Card Maker step-by-step.
Step 1. Implementing the Card Maker Interface
Let’s first focus on creating a simple layout for our card maker. We’ll set up a form with fields for the user to add a name, greeting, and an image upload. We’ll also add a preview area where the card will be displayed.
Here’s what the base layout will look like:
📄 app.vue
<template>
  <div class="flex justify-center h-screen items-start bg-gray-100 pt-20">
    <div class="border p-8 w-96 bg-white flex flex-col gap-8">
      <h1 class="text-xl font-medium">Christmas Greeting Card Maker</h1>
      <div class="border aspect-square banner-here relative" v-html="svg"></div>
      <form class="flex flex-col gap-4">
        <input type="text" v-model="form.name" class="px-4 py-1 border w-full" placeholder="Enter name" />
        <input type="text" v-model="form.greeting" class="px-4 py-1 border w-full" placeholder="Enter greeting" />
        <input type="file" accept=".png, .jpg, .jpeg" @change="handleFileChange" class="px-4 py-1 border w-full" />
        <small class="text-gray-400">Must be an image below 100kb, png, jpeg, or jpg formats only.</small>
        <button class="bg-indigo-500 text-white px-4 py-2" @click.prevent="downloadSvgAsJpeg(svg)">Download</button>
      </form>
    </div>
  </div>
</template>

<script setup lang="ts">
...
So what’s happening here?
- Card Preview: The
<div>withv-html="svg"is where our card will appear as an SVG once it’s generated. - Form Fields:
- Two text fields:
nameandgreeting. These will dynamically update the card when the user types. - File input: Allows users to upload an image.
- Two text fields:
- File Restrictions: The
smalltag below the file input informs users about allowed file size and formats. Large images can slow down rendering, so we’re capping the size at 100KB. - Download Button: This triggers the
downloadSvgAsJpegfunction, which saves the card as a JPEG image.
Step 2. Setting up Dependencies
Now let’s set up the logic and install the packages needed to power our Holiday Card Maker. Let’s import a few packages that will make things easier for us.
📄 app.vue
...
</template>

<script setup lang="ts">
import { createSSRApp } from "vue";
import { renderToString } from "@vue/server-renderer";
import { useLocalStorage, watchDebounced } from "@vueuse/core";
import satori from "satori";
import { html } from "satori-html";
import ChristmasCard from "./components/ChristmasCard.vue";

const form = useLocalStorage("app-form", {
  name: "",
  greeting: "Merry Christmas",
  photo: null,
});
const svg = ref("");
const fonts = ref([]);

...
</script>
Why do we need this setup?
createSSRAppandrenderToString: Render Vue components to HTML strings by virtually mounting the component and its props and rendering out its final output.useLocalStorage: Save form data locally, so users don’t lose progress if they reload.watchDebounced: Helps us prevent performance issues by delaying the processing of user inputs until a certain duration after typing has stopped.satori: Convert HTML to SVG for our graphics.satori-html: Parse HTML strings into a formatsatoriunderstands.- The fonts ref uses
useLocalStorageto persists the user’s inputs. If you refresh the page, we won’t lose the form input and can continue where we left. - The
svgandfontsvariables will store the generated card design and loaded font data.
Step 3. Creating the Card Template
Next, let’s create the card template component we imported earlier. This is where the magic happens.
We’ll use the data from the form to personalize the card. In components/ChristmasCard.vue, we’ll design our card’s visual template. Think of this like designing a canvas where users can personalize their greeting.
📄 components/ChristmasCard.vue
<template>
  <div class="w-full bg-red-500 h-full flex flex-col text-white text-7xl font-bold p-10 items-center justify-center"
    style="background-image: url(/img/sincerely-media-8EhZobADF8M-unsplash.jpg);">
    <div class="font-bold mb-8 " style="font-size: 100px;"> {{ greeting }}</div>
    <img v-if="photo" :src="photo" class="rounded-full border-4 border-red-900 mb-8" style="width:400px;height:400px">
    <div class="bg-red-500 px-2 py-2">From</div>
    <div> {{ name || 'Add your name here' }}</div>
  </div>
</template>

<script setup lang="ts">
defineProps(['name', 'greeting', 'photo'])
</script>
Here’s what’s happening:
- Placeholders:
{{ greeting }}and{{ name }}dynamically display user inputs. - Image Upload: If the user uploads an image, it appears in the card.
- Background: We’re adding a festive look with a red background image from unsplash.
Step 4. Loading Fonts and Initializing the App
Back to the app.vue file, here we have to first load up at least one font file, as Satori requires it to render the graphics. Since our app logic happens on the client, let’s set up some hooks to initialize things and render the graphics for the first time.
📄 app.vue
// Back to app.vue
...
onMounted(async () => {
  fonts.value = await loadFonts([{ name: "InstrumentSans", url: "/fonts/InstrumentSans-Regular.ttf" }]);
  refreshGraphics();
});

watchDebounced(form, refreshGraphics, { deep: true, debounce: 500, maxWait: 1000 });

async function loadFonts(fonts) {
  return Promise.all(
    fonts.map(async (font) => ({
      ...font,
      data: await (await fetch(font.url)).arrayBuffer(),
    }))
  );
}
...
Breaking it down:
- We use the
onMountedhook, which is auto-imported in Nuxt 3, to load and store the fonts needed for generating the graphics. - You can use any
.ttffont file. To get the same font I used, “Instrument Sans” font, visit Google Fonts, click “Get Font,” then download the font files. Extract the ZIP file, and copy the.ttffont (e.g.,InstrumentSans-Regular.ttf) into thepublic/fontsfolder of your Nuxt project. Reference it as/fonts/InstrumentSans-Regular.ttfin your code. - Inside
onMounted, we callrefreshGraphicsto generate the initial SVG graphics once the font has loaded. - We use
watchDebouncedto track changes in the form and update the graphics 500ms after the last update. Note: this is a performance trick. - The
loadFontsfunction loads the required fonts all at once usingPromise.allinstead of sequentially. Another performance trick to note.
Step 5. Generating SVG from Vue Component
Here’s where we tie everything together. We’ll convert the ChristmasCard component into an SVG.
📄 app.vue
...
async function refreshGraphics() {
  const content = await renderToHTML(ChristmasCard, form.value);
  const markup = html(content);
  svg.value = await satori(markup, { width: 1080, height: 1080, fonts: fonts.value });
}
...
Let me explain:
- We first use the
renderToHTMLutility function to convert theChristmasCard.vuecomponent imported earlier into HTML string - Then we are using the
htmlfunction imported fromsatori-htmlearlier to convert the HTML string into a markup format acceptable by thesatoripackage - Finally, we call
satori, passing in the markup, width and height configuration as well as the fonts that we loaded earlier in theonMountedhook - The resulting svg string is stored in the
svg.valueref, which we used in the app.vue template section to display the svg on the viewport. See<div class="border aspect-square banner-here relative" v-html="svg"></div>in the template section
Step 6. Utility Functions
Let’s wrap up everything we’ve been working on by adding some essential utility functions for our code and template features.
Adding Image Upload Support
We’re adding functionality to handle image uploads. This will ensure that users can select an image, check if it’s within the size limit (100KB), and display it.
Paste this below the refreshGraphics code:
📄 app.vue
...
async function handleFileChange(event: Event) {
  const file = (event.target as HTMLInputElement)?.files?.[0];
  if (file && file.size > 100 * 1024) throw new Error("File size must be below 100kb");
  const reader = new FileReader();
  reader.onload = () => (form.value.photo = reader.result as string);
  reader.readAsDataURL(file);
}
...
Why check file size? We’re limiting the file size to ensure smooth performance. Anything larger could slow things down, so 100KB is a safe upper limit.
Converting Vue component to HTML string
Next, we’ll render the Vue component as an HTML string. This allows us to use Vue for server-side rendering, email templates, or static site generation. In this case, it’s for generating a greeting card template. Let’s add this as well to our code.
...
async function renderToHTML(Component, props = {}) {
  return await renderToString(createSSRApp(Component, props));
}
...
Explanation:
createSSRApp: This function is used to create a server-side rendered (SSR) Vue application instance, which can be rendered to an HTML string.renderToString: This renders the Vue component (GreetingCard) to an HTML string, passing any props needed by the component.
Downloading the Card as a JPEG
Finally, let’s add code that will enable us to download our card as a JPEG.
📄 app.vue
...
function downloadSvgAsJpeg(svgString, filename = "image.jpeg") {
  const blob = new Blob([svgString], { type: "image/svg+xml" });
  const url = URL.createObjectURL(blob);
  const img = new Image();

  img.onload = () => {
    const canvas = document.createElement("canvas");
    canvas.width = canvas.height = 1080;
    canvas.getContext("2d")?.drawImage(img, 0, 0, 1080, 1080);
    const link = document.createElement("a");
    link.href = canvas.toDataURL("image/jpeg");
    link.download = filename;
    link.click();
    URL.revokeObjectURL(url);
  };
  img.src = url;
}
</script>

<style>
...
Why does this work? By using HTML Canvas API, we can draw the SVG onto the canvas and convert it into a JPEG for easy downloading. It’s a quick and efficient way to generate image files from vector graphics.
Step 7. Styling
To ensure the SVG element is displayed correctly within the container, we need to apply some CSS styling. Since the generated SVG has a fixed size of 1080px by 1080px, but the parent container is smaller, we need to scale the SVG to fit inside the container without distortion.
📄 app.vue
...

<style>
.banner-here svg {
  width: 100%;
  height: 100%;
}
</style>
This CSS rule ensures that the SVG element inside the .banner-here div is resized to fill the available space while maintaining its aspect ratio.
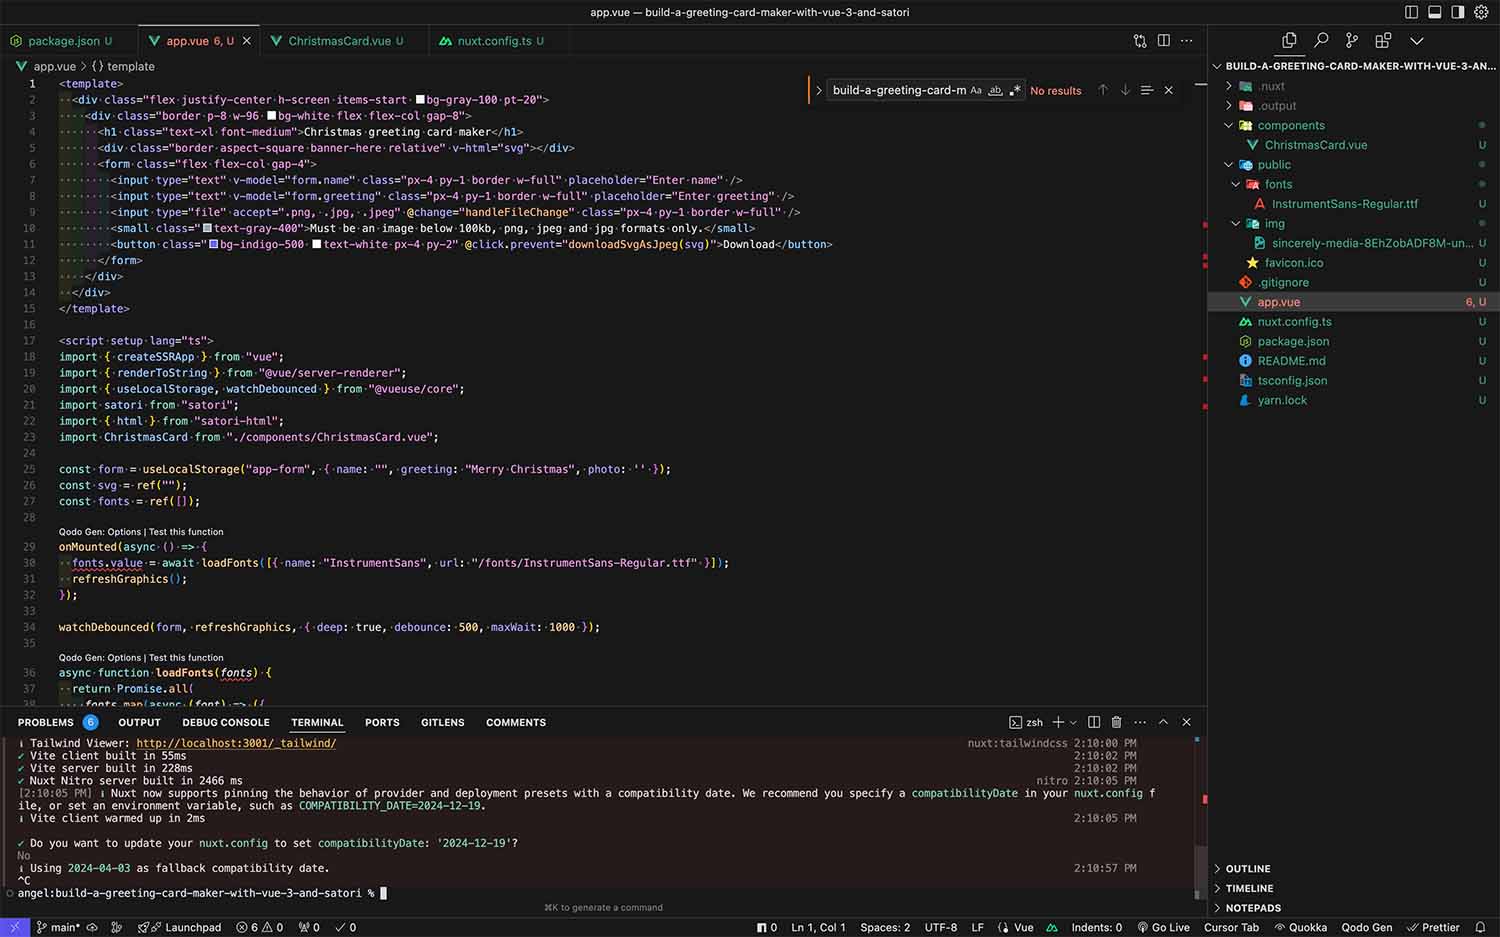
By now, your project should look something like this screenshot. Let’s run it to see the real magic!
Running our code
To see our app in action, run the command below and open http://localhost:3000 on your browser.
For reference, here is the Github repo for this tutorial.
yarn dev

You should see something resembling the interface in the GIF above. You can edit the details, add an image, and download your image. Congrats! You now have your own personal Holiday Card maker.
Wrapping Up
You’ve just built a personalized greeting card maker! 🎉 But don’t stop here. Experiment with different designs, add more customization options, or even create cards for other occasions.
Some ideas to expand your project:
- Add more background themes
- Include text color/font selection
- Create templates for birthdays, anniversaries
Want to do more on the client side? Discover how to render 3d objects in the browser by reading this article.


