Verifying user identity is crucial for protecting sensitive data. Authentication ensures users are who they claim to be, providing a vital defense against unauthorized access.
The Nuxt team understands the importance of Authentication which is why with Nuxt 2, we had the Auth Module. The Auth module provided zero-boilerplate authentication for Nuxt 2 using a configurable authentication scheme (cookie, local, etc) or any of its supported providers(Auth0, Facebook, etc).
Since the introduction of Nuxt 3, there have been 3rd party plugins like the Sidebase Nuxt Auth, Authjs Nuxt based on Auth.js that have made the authentication process easier for developers.
In this article, we will look into the Nuxt Auth Utils module, its features, and how to get started. The complete code for this article can be found on GitHub.
Introduction
Nuxt Auth utils is a minimalist authentication module for Nuxt exposing Vue composables and server utils. While there are other modules and plugins with more features for authentication, Nuxt Auth Utils is great for implementing authentication on your own as it provides an opportunity to learn.
With Nuxt Auth Utils, you automatically get access to data like loggedIn, user, and session, and the clear method available in the useUserSession() composable. These properties return updated information about the current user’s session and can be accessed anywhere in your app.
This is similar to how we use the $auth property to access user information in Nuxt 2, the difference now is that Nuxt 3 takes advantage of Vue Composables introduced in Vue 3.
Creating a personalized profile header with the current user’s name can be done like this:
<template>
  <header>
    <template v-if="loggedIn">
      <p>
        Hi
        {{ user?.username }}
      </p>
      <button @click="logout">Log out</button>
    </template>
    <p v-else>Guest</p>
  </header>
</template>

<script setup>
const { loggedIn, user, clear } = useUserSession();

const logout = () => {
  clear();
};
</script>
Using server utils, Nuxt auth utils automatically imports some helpers into the server/ directory that helps with session management. They include:
setUserSession: This function accepts two arguments,event, and an object. Inside this object, we are expected to pass auserobject along with any extra information we want to save with the session.replaceUserSession: This function behaves similarly to thesetUserSessionbut as the name implies, it replaces the current session data with the new user data that is passed.getUserSession: This function returns information about the current user session. This information is the same as the object passed tosetUserSessionandreplaceUserSession.clearUserSession: This function is used to clear a user’s session.requireUserSession: This function works like a middleware that checks for a user session and returns it if present otherwise it returns a401error.
await setUserSession(event, {
  user: {
    // ... user data
  },
  loggedInAt: new Date()
  // Any extra fields
})

// Replace a user session. Same behaviour as setUserSession, except it does not merge data with existing data
await replaceUserSession(event, data)

// Get the current user session
const session = await getUserSession(event)

// Clear the current user session
await clearUserSession(event)

// Require a user session (send back 401 if no `user` key in session)
const session = await requireUserSession(event)
Note that this module requires the Nuxt server to be running as it uses the server API route hence, it cannot run with nuxt generate.
Nuxt Auth Utils Features
Hybrid Rendering
Hybrid rendering allows different caching rules per route using Route Rules and decides how the server should respond to a new request on a given URL.
When used with Nuxt Auth Utils, it does not fetch the user session during prerendering. It waits until after hydration and fetches it on the client side. This is because user sessions are stored in a secure cookie that cannot be accessed during prerendering.
As a solution to this, we use the <[AuthState](https://github.com/Atinux/nuxt-auth-utils/blob/c8b02d0b84a53ab4dd41f1808d9365d1c52c8366/src/runtime/app/components/AuthState.vue)> component to safely display auth-related data without worrying about the rendering mode.
<template>
  <header>
    <AuthState v-slot="{ loggedIn, clear }">
      <button v-if="loggedIn" @click="clear">Logout</button>
      <NuxtLink v-else to="/login">Login</NuxtLink>
    </AuthState>
  </header>
</template>
This component also offers support for a loading state that comes in handy while the user session is being fetched on the client side.
OAuth Providers
Other than the native email/username and password authentication flow, Nuxt Auth Utils also offers support for authentication with third-party services using OAuth. It also comes with event handlers that are exposed from the oauth global variable that is available in your server routes (server/ directory). Some of the supported providers include:
- GitHub
- Auth0
- LinkedIn.
Extendable with Hooks
This module also provides hooks that let you perform extra actions when a session is fetched or updated. This can be achieved by using sessionHook.hook method, which accepts a hook string (’fetch’ or ‘clear’).
export default defineNitroPlugin(() => {
  // Called when the session is fetched during SSR for the Vue composable (/api/_auth/session)
  // Or when we call useUserSession().fetch()
  sessionHooks.hook('fetch', async (session, event) => {
    // extend User Session by calling your database
    // or
    // throw createError({ ... }) if session is invalid for example
  })

  // Called when we call useServerSession().clear() or clearUserSession(event)
  sessionHooks.hook('clear', async (session, event) => {
    // Log that user logged out
  })
})
This method is available anywhere in the server/ directory.
Getting Started with Nuxt Auth Utils
To fully understand how Nuxt Auth Utils work, we will build a simple Nuxt app that uses an SQL server.
Setup
First, we create our Nuxt project using the npx command;
npx nuxi@latest init nuxt-auth-demo
To use the auth utils in your Nuxt project, you need to install it using the following command:
npx nuxi@latest module add auth-utils
Once this installation is completed, our nuxt.config.ts file gets updated with the following lines of code:
📄 nuxt.config.ts
// https://nuxt.com/docs/api/configuration/nuxt-config
export default defineNuxtConfig({
  devtools: { enabled: true },
  modules: ["nuxt-auth-utils"] // added automatically
})
Here, nuxt-auth-utils is added to the modules array so our application can start up our application with the configuration for the module. The next thing we need to do is to add NUXT_SESSION_PASSWORD to our .env file. This step is optional in development as the plugin automatically generates one if it isn’t set.
Building The Server
Now that the configuration is complete, we will build our server. For this, we will use a simple SQLite server that requires username and password for both signup and login.
The first thing we need to do is create a server/ directory in the root folder of our project. This directory will contain folders for both our database configuration and authentication files.
Here’s what our project structure will look like:
nuxt-auth-demo/
│
├── server/
│   ├── api/
│   │   ├── auth/
│   │   │   ├── signup.js
│   │   │   ├── login.js
│   ├── db/
│   │   ├── database.js
│
├── other-project-files
Before we can set up our database, we need to install the following packages in our project:
sqlite: This is the SQLite library for Node.js, which allows us to interact with SQLite databases.sqlite3: This is the SQLite3 database driver for Node.js, used by thesqlitelibrary.bcrypt: This is a library to help us hash passwords, ensuring that user passwords are stored securely.
You can install these packages using the following command:
yarn add sqlite sqlite3 bcrypt
After installing, we create a database.js file and add the following:
📂 server/db/database.js
import { open } from "sqlite";
import sqlite3 from "sqlite3";

export const initDb = async () => {
  try {
    const db = await open({
      filename: "./database.sqlite",
      driver: sqlite3.Database,
    });

    await db.exec(`
      CREATE TABLE IF NOT EXISTS users (
        id INTEGER PRIMARY KEY AUTOINCREMENT,
        username TEXT UNIQUE,
        password TEXT
      )
    `);

    console.log("Database initialized successfully");
    return db;
  } catch (error) {
    console.error("Failed to initialize database:", error);
    throw error;
  }
};
This file establishes and initializes the SQLite database, makes sure the required tables are there, and offers a connection method.
Firstly, we import open function which is used to open and connect to the db, and sqlite3, which is the SQLite database driver. We export initDb function, which will open and connect to the db.
In this function, we call the open function and pass an object:
{
    filename: "./database.sqlite",
    driver: sqlite3.Database,
}
This object contains filename, which accepts the file path to our database file.
This file is automatically created the first time initDb is run and it uses the file path passed to this field to create this value. This means “./database.sqlite” will be created in the root folder of our project while "./server/db/database.sqlite" will be created inside the db/ directory.
We also have a driver property that specifies which database to use (sqlite3.database).
The open function resolves a promise, so we wrap it in a try/catch block. If the connection is successful, we execute an SQL command db.exec, which creates a users table if it does not exist in the db with each row having columns for a unique id, and username, and password.
Still, if it fails, we throw an error that says Failed to initialize database with the specific error.
Finally, we export this initDb function to reference our db from our auth files.
After setting up our database, we will create an api folder inside the server/ directory. Within this folder, we will create an auth folder, which will contain both the signup.js and login.js files.
Let us start with signup.js:
📂 server/api/auth/signup.js
import bcrypt from "bcrypt";
import { initDb } from "../../db/database";

export default defineEventHandler(async (event) => {
  try {
    const body = await readBody(event); // Retrieve request body
    if (!body) {
      return { error: "Request body is empty or undefined" };
    }

    const { username, password } = body;

    if (!username || !password) {
      return { error: "Username and password are required" };
    }

    const db = await initDb(); // Initialize database connection
    const hashedPassword = await bcrypt.hash(password, 10); // Hash password

    try {
      // Insert user data into database
      await db.run("INSERT INTO users (username, password) VALUES (?, ?)", [
        username,
        hashedPassword,
      ]);
      const userData = { username: user.username };
      await setUserSession(event, {
        user: userData,
        loggedInAt: new Date(),
      });
      return { success: true, user };
    } catch (error) {
      console.error("Error creating user:", error);
      return createError({
        statusCode: 409,
        statusMessage: "Username already exists",
      });
    }
  } catch (error) {
    console.error("Error handling signup request:", error);
    return createError({
      statusCode: 400,
      statusMessage: "Failed to process request",
    });
  }
});
Here, we use the defineEventHandler function to set up our signup API so Nuxt recognizes our API and makes it available under /api/auth/signup. In this function, we can access the body of this request (i.e username and password) by passing event to readBody.
This function resolves a promise, so we must handle it within a try/catch block to properly manage potential errors.
On success, we get the request’s body and destructure it to extract username and password. If there’s an error, we use createError for error handling. This ensures that any issues during the process are captured and reported appropriately.
Before we can proceed with storing this user data in the database, we need to hash the user’s password. We use the bcrypt.hash method, which accepts two arguments: password and salt. The password is the user’s plain text password, and 10 is the salt length, determining the complexity of the hashing process.
If the provided data is valid, the signup process succeeds, and we fetch the newly created user information using db.get. This information is then passed to setUserSession with a loggedInAt property to store the time.
At this point, our signup endpoint is ready and we can test it using either the Nuxt DevTools or by creating a signup.vue file in the pages/ directory.
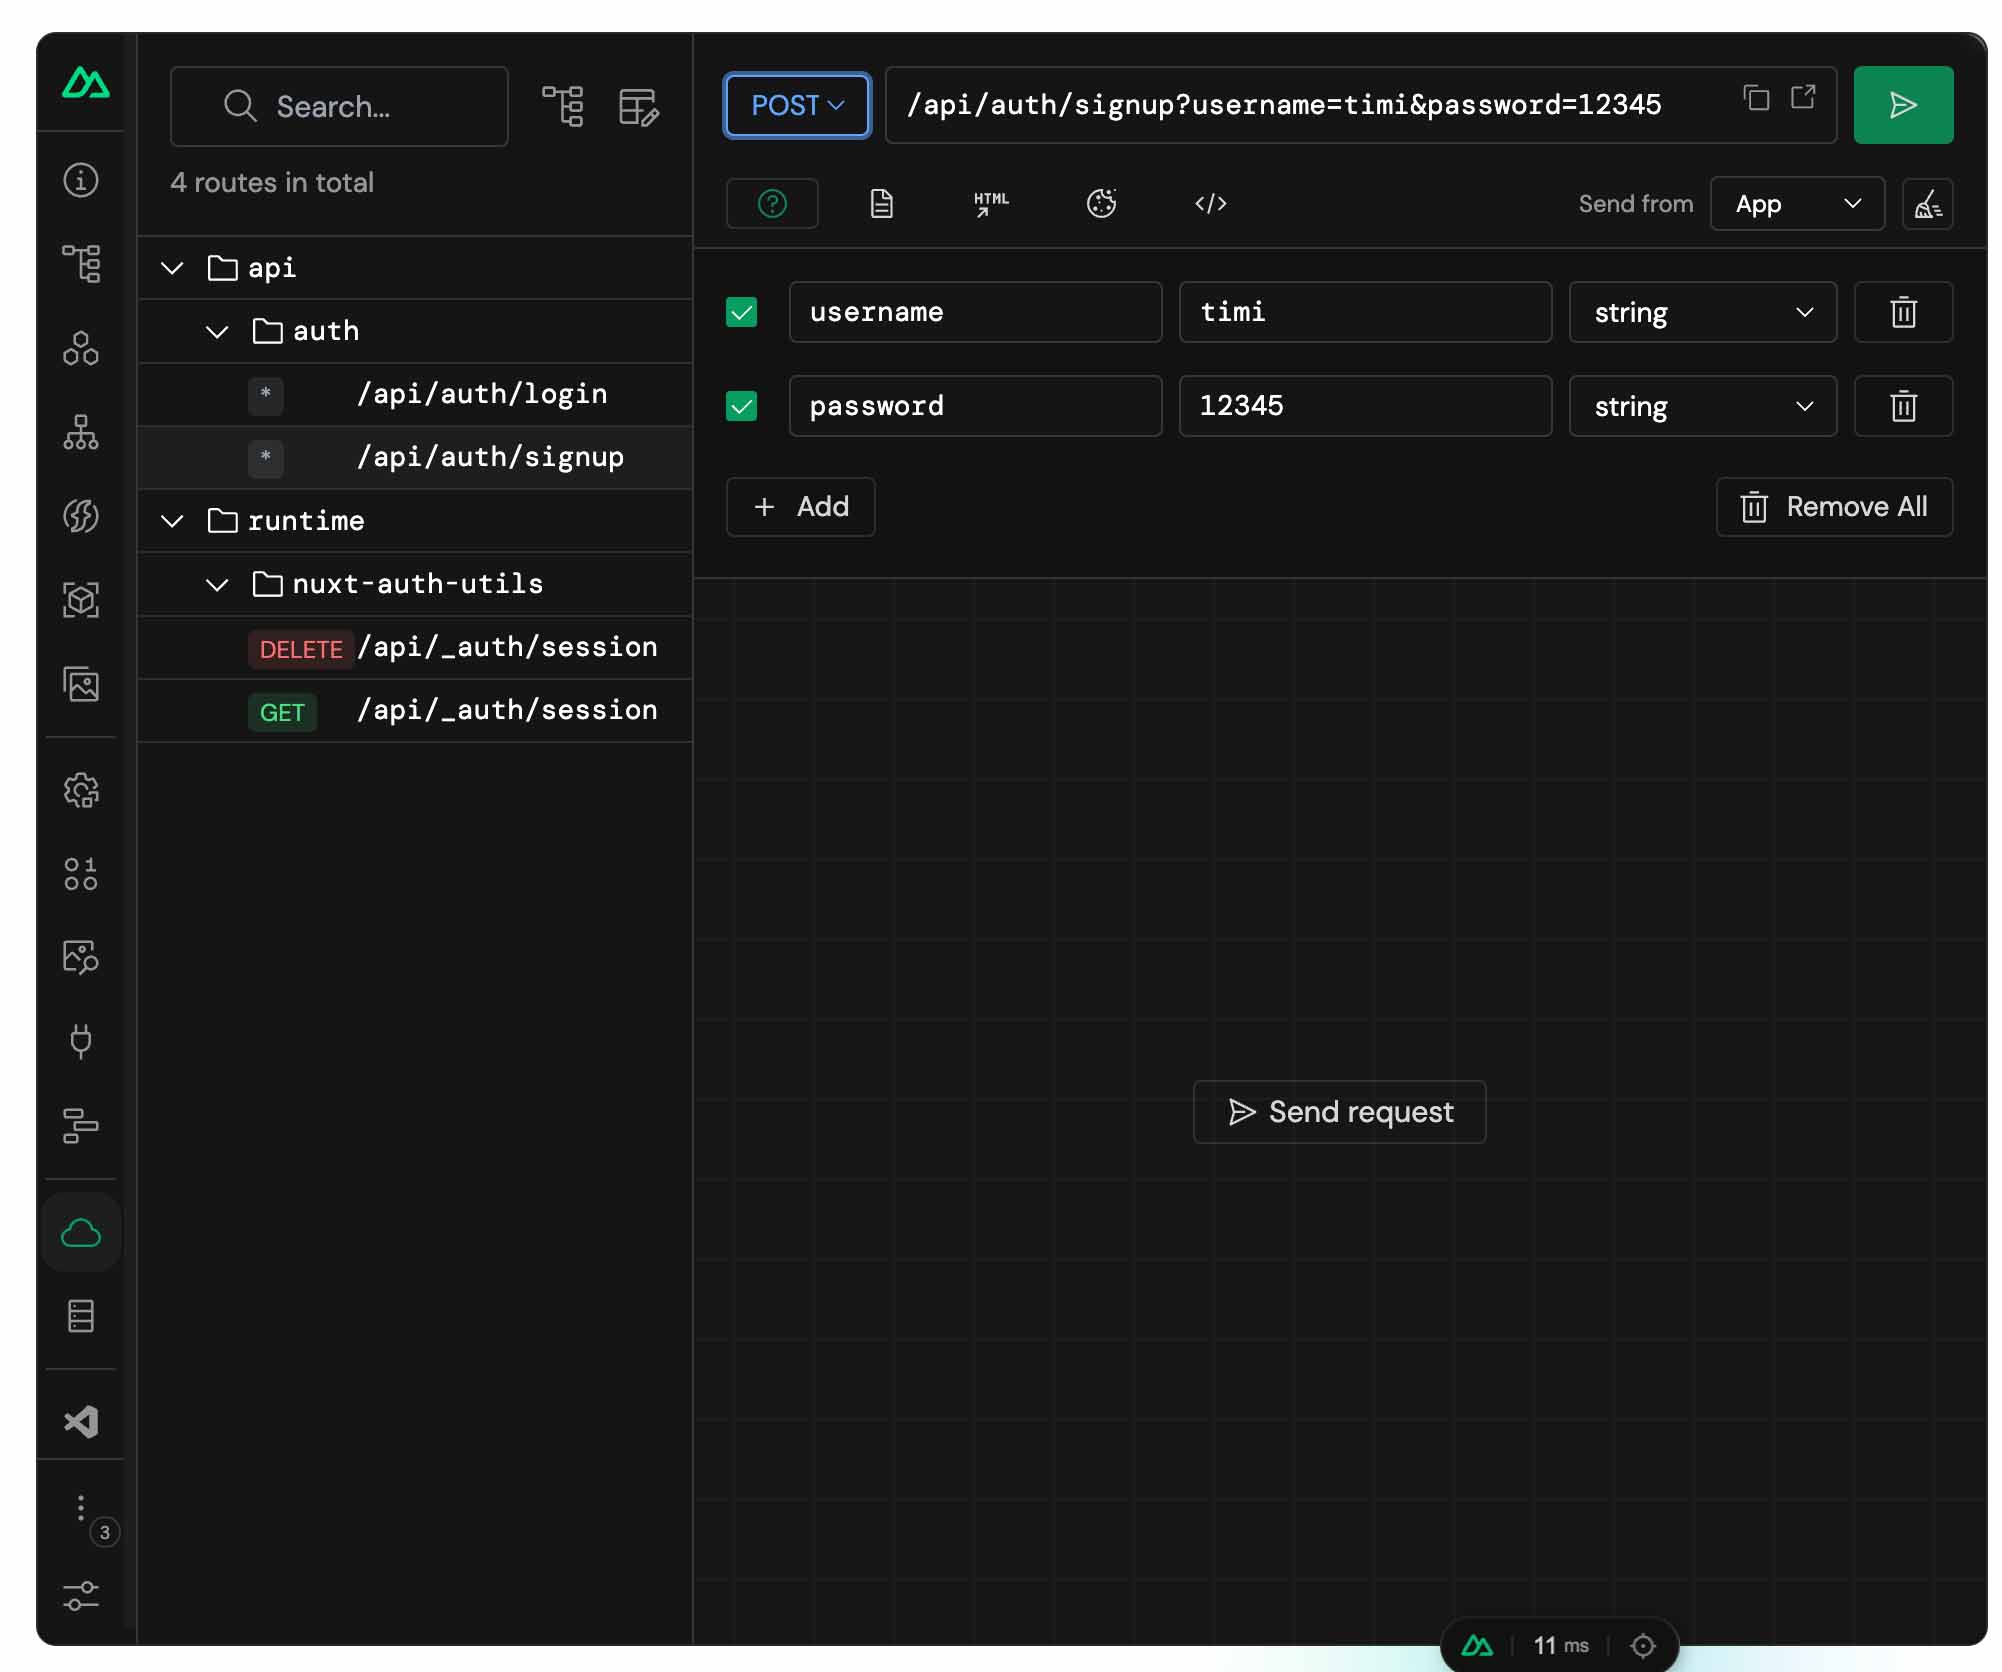
When building out APIs in the server/ directory, Nuxt DevTools can automatically read the directory for valid APIs to display for easy testing. This is why we can see our api folder listed here but not the db folder. Using this approach, we can quickly test our API to ensure it works.
In our app, we’re going to create a form component, AuthForm.vue in our components/ directory which will look like this:
📂 components/AuthForm.vue
<template>
  <form @submit.prevent="submit" class="auth__form">
    <h1 class="auth__heading">{{title}}</h1>
    <div class="auth__div">
      <label for="username" class="form__label">Username</label>
      <input
        type="text"
        name="username"
        id="username"
        required
        v-model="username"
        class="form__input"
      />
    </div>
    <div class="auth__div">
      <label for="password" class="form__label">Password</label>
      <input
        type="password"
        name="password"
        id="password"
        required
        v-model="password"
        class="form__input"
      />
    </div>
    <button class="form__button" :disabled="loading">
      <template v-if="loading">please wait...</template>
      <template v-else>{{title}}</template>
    </button>
  </form>
</template>

<script setup>
const username = ref("");
const password = ref("");

defineProps({
  loading: {
    type: Boolean,
    default: false,
  },
  title: {
    type: String,
    required: true,
  },
});
const emit = defineEmits(["submit"]);

const submit = () => {
  const payload = {
    username: username.value,
    password: password.value,
  };
  emit("submit", payload);
};
</script>

<style lang="scss" scoped>
.auth {
  &__form {
    border: 1px solid #e0e0e0;
    padding: 20px;
    border-radius: 8px;
  }
  &__div {
    margin-bottom: 30px;
  }
}

.form {
  &__label {
    display: block;
    margin-bottom: 4px;
    max-width: 300px;
    box-sizing: border-box;
  }
  &__input {
    height: 50px;
    width: calc(100% - 20px);
    padding-left: 20px;
    border-radius: 8px;
    border: 1px solid #e0e0e0;
  }
  &__button {
    height: 50px;
    border-radius: 8px;
    background-color: #008065;
    color: #fff;
    border: 0;
    width: 100%;
    cursor: pointer;
  }
}
</style>
In this component, we create a form that accepts username and password. When the form is submitted, the submit function emits the value obtained from the form to the parent component using the submit event.
We also define props using the defineProps method: title, and loading. Since we plan to use this form for signup and login, we use the title prop to make the form heading dynamic. We use the loading prop to indicate a network request is in progress and to disable the button during this time.
In pages/ directory, we create signup.vue with the following code:
📂 pages/signup.vue
<template>
  <div class="signup">
    <AuthForm :loading="loading" @submit="register" title="Sign up" />
    <p class="signup__text">
      Already registered?
      <nuxt-link :to="{ name: 'login' }">Log in</nuxt-link>
    </p>
  </div>
</template>

<script setup>
import AuthForm from "@/components/AuthForm.vue";

const loading = ref(false);
const router = useRouter();

const register = async (body) => {
  loading.value = true;
  try {
    await $fetch("/api/auth/signup", {
      method: "POST",
      body,
    });
    router.push({name: 'Dashboard'})
    loading.value = false;
  } catch (error) {
    alert(error.statusMessage || error);
    loading.value = false;
  }
};
</script>

<style lang="scss" scoped>
.signup {
  width: 100%;
  padding: 50px;
  max-width: 400px;
  margin: auto;
  color: #333333;
  &__text {
    text-align: right;
    & a {
      text-decoration: underline;
      color: inherit;
    }
  }
}
</style>
Here, we import AuthForm.vue, provide the necessary props, and assign the register function to handle the submit event. When this form is submitted, we call our signup method using $fetch, attaching the request body and method to the request.
On success, we redirect the user to the /dashboard route, which can contain information like username, ID, login time, etc.
Our dashboard.vue file looks like this:
📂 pages/dashboard.vue
<template>
  <header>
    <template v-if="loggedIn">
      <p>
        Hi
        {{ user?.username }}
      </p>
      <p @click="logout">Log out</p>
    </template>
    <p v-else>Hi Guest, <nuxt-link :to="{ name: 'login' }">Login</nuxt-link></p>
  </header>
</template>

<script setup>
const { loggedIn, user, clear, fetch } = useUserSession();

fetch()
const logout = () => {
  clear();
};
</script>

<style lang="scss" scoped></style>
Here, we use the Nuxt Auth Utils composable to fetch log-in status (loggedIn), user information (user), the fetch function that fetches the updated user information, and logout function (clear). With this data available, we can display the username of the currently authenticated user.
Our login.js API looks like this:
📂 server/api/auth/login.js
import bcrypt from "bcrypt";
import { initDb } from "../../db/database";

export default defineEventHandler(async (event) => {
  try {
    const body = await readBody(event); // Retrieve request body
    if (!body) {
      console.error("Request body is empty or undefined");
      return createError({
        statusCode: 400,
        statusMessage: "Request body is empty or undefined",
      });
    }

    const { username, password } = body;

    if (!username || !password) {
      console.error("Username or password missing");
      return createError({
        statusCode: 400,
        statusMessage: "Username and password are required",
      });
    }

    const db = await initDb(); // Initialize database connection
    const user = await db.get("SELECT * FROM users WHERE username = ?", [
      username,
    ]);

    // For security reasons, do not specify if username or password is incorrect
    if (!user || !(await bcrypt.compare(password, user.password))) {
      console.error(`Invalid username or password for user: ${username}`);
      return createError({
        statusCode: 401,
        statusMessage: "Invalid username or password",
      });
    } else {
      const userData = { username: user.username };
      await setUserSession(event, {
        user: userData,
        loggedInAt: new Date(),
      });
    }

    return { success: true, user };
  } catch (error) {
    console.error("Error handling login request:", error);
    return createError({
      statusCode: 500,
      statusMessage: "Failed to process request",
    });
  }
});
This file is similar to the signup.js file as we use defineEventHandler to declare our login function. After verifying the body of the login request contains both username and password, we initialize a connection to the database using our imported initDb function.
Upon a successful connection, we query the database for a matching username using the .get("SELECT * FROM users WHERE username = ?",[username]) where username is the provided username in the body of the request. We also compare the provided password with the password in the database (if the user exists) using the bcrypt.compare method and return an error if the passwords do not match.
If the user exists in the database, we set the user session by calling setUserSession and also pass user and loggedInAt to our session data.
Finally, we use createError to handle all the possible errors that may occur from this request and attach the appropriate status code and explanatory messages.
To test our login function, we create a login.vue in the pages/ directory.
📂 pages/login.vue
<template>
  <div class="login">
    <AuthForm :loading="loading" @submit="login" title="Sign in" />
    <p class="login__text">
      New here?
      <nuxt-link :to="{ name: 'signup' }">Sign up</nuxt-link>
    </p>
  </div>
</template>

<script setup>
import AuthForm from "@/components/AuthForm.vue";

const loading = ref(false);
const router = useRouter();

const login = async (body) => {
  loading.value = true;
  try {
    await $fetch("/api/auth/login", {
      method: "POST",
      body,
    });
    router.push({name: 'Dashboard'})
    loading.value = false;
  } catch (error) {
    console.log({error});
    alert(error.statusMessage ||error);
    loading.value = false;
  }
};
</script>

<style lang="scss" scoped>
.login {
  width: 100%;
  padding: 50px;
  max-width: 400px;
  margin: auto;
  color: #333333;
  &__text {
    text-align: right;
    & a {
      text-decoration: underline;
      color: inherit;
    }
  }
}
</style>
In this file, we use the AuthForm component to collect the user details and pass them to the login function. In this function, we call our login endpoint /api/auth/login and pass the payload which we get from the AuthForm component.
On a successful login, we redirect the user to the /dashboard page by calling router.push({name: 'Dashboard'}) where Dashboard is the route name which we show the username and a log out button.
In this tutorial, we set up a basic session and user data implementation. However, our implementation can be further extended to use a stateful setup where a random session token is generated and stored in the user table, which can be used to verify a session’s validity. To see how this is done, be on the lookout for the Nuxt Authentication course.
Wrapping up
In this article, we have covered creating a server in Nuxt with SQL and how to use Nuxt Auth Utils to manage user sessions. We explored the features of Nuxt Auth Utils and highlighted their usefulness.
With Nuxt Auth Utils, managing user sessions becomes seamless, secure, and efficient, ensuring your application provides a reliable and secure authentication experience and CSRF protection. To further your learning, take our Nuxt Authentication course here on Vue Mastery!