Have you ever spent hours tweaking the same web layout across multiple pages or struggled to make your UI adapt to changing data without breaking? These common challenges can slow down your development process and lead to frustrating, error-prone code.
Introducing Dynamic Layouts
By creating layouts at runtime based on data, you can build flexible, maintainable, and scalable applications that adapt effortlessly to changes. This approach,called Dynamic layouts, eliminates the need for repetitive HTML edits, allowing your UI to stay in sync with your data seamlessly.
In this article, we’ll explore how dynamic layouts can transform your development workflow and elevate your projects.
Why Use Dynamic Layouts?
Dynamic layouts are particularly beneficial when content frequently changes or when displaying responsive UIs that pull from APIs, other data sources, or respond to user interactions.
Benefits of Dynamic Layouts
- Flexibility: Easily adjust UI components based on underlying data without modifying HTML or template code.
- Maintainability: Adhere to the DRY (Don’t Repeat Yourself) principle, reducing repetitive code and simplifying maintenance.
- Scalability: Manage your UI programmatically, allowing for easy updates, additions, or removals of items.
- Error Reduction: Minimize manual HTML edits, decreasing the likelihood of errors.
- Enhanced Responsiveness: Dynamically show or hide UI elements based on conditions, making the interface more responsive to user interactions or data changes.
Practical Scenarios for Dynamic Layouts
Dynamic layouts shine in various real-world scenarios, such as:
- Forms: For form-heavy apps, it might be best to abstract you form fields into a computed property paired with some validation library. In the layout you can loop through your property to conditionally show form fields and properties like labels, class names, validation messages etc.
- Blog Post Lists: Manage and update each post card’s content dynamically based on its data.
- Content Blocks: Organize and display diverse content elements efficiently.
- User Lists, Navigation Items, Dashboard Panels: Ensure consistent styling and easy adjustments without manual HTML updates.
- Website Sections: Dynamically generate sections to maintain a cohesive and easily adjustable layout.
By generating these elements dynamically, you ensure consistency, simplify adjustments, and maintain a clean codebase.
Building a Dynamic Navbar
Let’s gain hands-on experience with dynamic layouts by building a dynamic navbar. For reference, here is the Github repo for this tutorial.
Requirements
Imagine you’re developing a payment platform and need to create a clean, extensible navbar component as shown in the screenshots below:
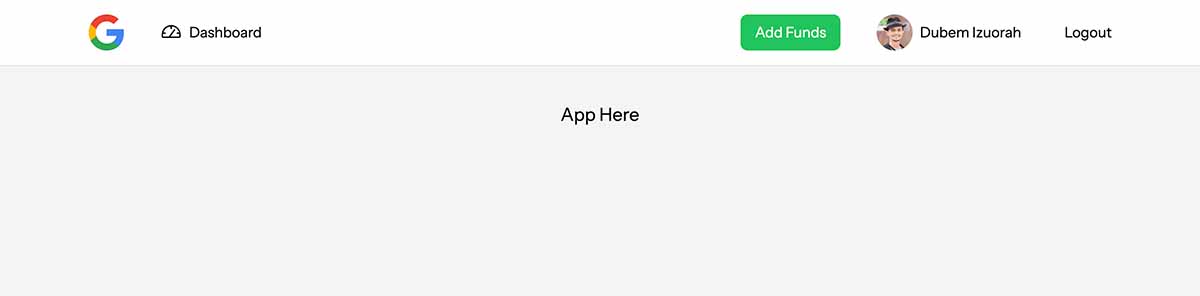
Navbar when a user is logged in
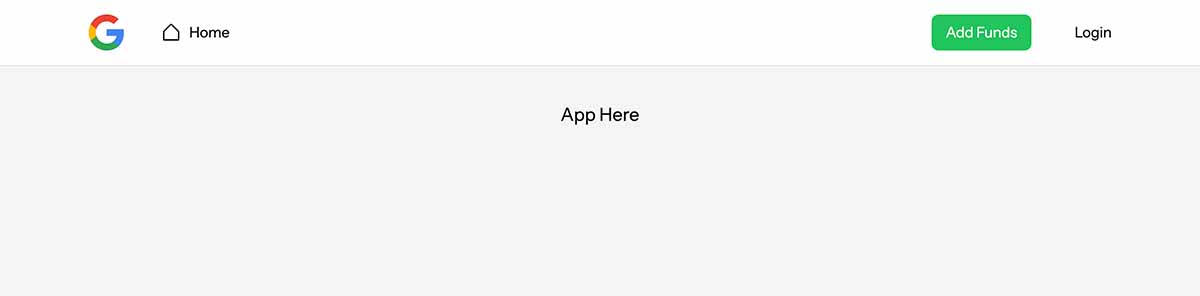
Navbar with no user logged in
Setting up the Environment
To focus on dynamic layouts, we won’t delve into environment setup details here. You can find the complete code samples in our GitHub repository.
Technologies Used:
- Nuxt – Vue framework
- Nuxt TailwindCSS – Styling
- Phosphor-icons Vue – Icon components
Static Approach
A static Navbar component involves numerous HTML tags and properties, making the code hard to read and maintain.
Updating such a layout is error-prone, especially with repetitive elements sharing the same properties or styling.
While a static approach is useful for drafting layouts, dynamic layouts are preferable for maintainability and collaboration.
Example of a Static Navbar:
📄 App.vue
<template>
  <nav class="w-screen border-b py-4">
    <div class="container mx-auto flex items-center gap-10">
      <!-- Logo -->
      <NuxtLink href="/" class="flex items-center">
        <img src="https://logo.clearbit.com/google.com" class="w-10 h-10 object-contain" />
      </NuxtLink>

      <!-- Dashboard or Home Link -->
      <NuxtLink v-if="user" href="/dashboard" class="flex items-center">
        <PhGauge size="24" />
        <span class="ml-2">Dashboard</span>
      </NuxtLink>
      <NuxtLink v-else href="/home" class="flex items-center">
        <PhHouseSimple size="24" />
        <span class="ml-2">Home</span>
      </NuxtLink>

      <!-- Spacer -->
      <div class="ml-auto"></div>

      <!-- Add Funds Button (Visible only when user is authenticated) -->
      <button v-if="user" class="flex items-center">
        <span class="text-white bg-green-500 px-4 py-2 rounded-lg">Add Funds</span>
      </button>

      <!-- User Avatar (Visible only when user is authenticated) -->
      <div v-if="user" class="flex items-center">
        <Avatar src="https://randomuser.me/api/portraits/men/40.jpg" />
        <span class="ml-2">Dubem Izuorah</span>
      </div>

      <!-- Auth Button -->
      <button class="flex items-center" @click="user = !user">
        <span>{{ user ? 'Logout' : 'Login' }}</span>
      </button>
    </div>
  </nav>
  <main class="h-64 bg-gray-100 flex justify-center pt-10 text-xl">App Here</main>
</template>

<script setup lang="jsx">
import { ref } from "vue";
import { NuxtLink, Avatar } from "#components";
import { PhGauge, PhHouseSimple } from "@phosphor-icons/vue";

// Simulate user authentication status
const user = ref(true);
</script>
While static layouts may suffice for simple interfaces, dynamic layouts offer superior maintainability and scalability.
Dynamic Approach
To create a dynamic navbar, we’ll want to define our layout data and generate UI components based on this data.
Defining the Data
Instead of hard-coding each menu item, we can create a list of menu items in our script with properties like title, image, to, icon, render, and class. This allows us to dynamically generate the navbar based on the data.
📄 App.vue
<script setup lang="jsx">
// Import necessary components
import { ref, computed } from "vue";
import { NuxtLink, Avatar } from "#components";
import { PhGauge, PhHouseSimple } from "@phosphor-icons/vue";

// Simulate user authentication status
const user = ref(true);

// Define menu items
const items = computed(() => [
  {
    key: "logo",
    image: "https://logo.clearbit.com/google.com",
    href: "/"
  },
  {
    icon: user.value ? PhGauge : PhHouseSimple,
    key: "dashboard",
    title: user.value ? "Dashboard" : "Home",
    to: user.value ? "/dashboard" : "/home",
  },
  {
    key: "spacer",
    class: "ml-auto",
  },
  {
    key: "add-funds",
    render: () => <span class="text-white bg-green-500 px-4 py-2 rounded-lg">Add Funds</span>
  },
  {
    key: "user",
    render: () => <Avatar src="https://randomuser.me/api/portraits/men/40.jpg" />,
    title: "Dubem Izuorah",
    hide: !user.value
  },
  {
    key: "auth",
    title: user.value ? "Logout" : "Login",
    onClick: () => user.value = !user.value
  },
]);

// Filter out hidden items
const menuItems = computed(() => items.value.filter(item => !item.hide));
</script>
Key Takeaways:
- Reactive Layout: Use computed properties to update the layout based on reactive data like
user. - Conditional Rendering: Apply different values using ternary operators based on state.
- JSX Integration: Utilize JSX to include HTML elements and Vue components directly within property values.
- Dynamic Properties: Use properties like
hideto conditionally display items. - Event Handling: Store functions or event handlers (e.g.,
onClick) within data objects. - Modular Data Management: Move layout data to Vue composables or external JSON files for better organization.
Defining the Avatar Component
Create an Avatar component used within the dynamic navbar.
📄 Avatar.vue
<template>
  <div class="rounded-full w-10 h-10 bg-gray-100 overflow-hidden">
    <img class="w-full h-full object-cover" :src="src" />
  </div>
</template>

<script setup>
const props = defineProps({
  src: {
    type: String,
    required: true,
  },
})
</script>
This component creates a reusable avatar element that can display different images based on the ‘src’ prop passed to it. This makes it flexible and easy to use throughout your application for displaying user avatars or profile pictures.
Building the Layout
Use the defined data to render the navbar dynamically.
📄 App.vue
<template>
  <nav class="w-screen border-b py-4">
    <div class="container mx-auto flex items-center gap-10">
      <component
        v-for="item in menuItems"
        :key="item.key"
        :is="item.to ? NuxtLink : 'button'"
        v-bind="item"
        @click="item.onClick"
        class="flex items-center"
      >
        <img v-if="item.image" :src="item.image" class="w-10 h-10 object-contain" />
        <component v-if="item.render" :is="item.render" />
        <component v-if="item.icon" :is="item.icon" :size="24" />
        <span v-if="item.title" class="ml-2">{{ item.title }}</span>
      </component>
    </div>
  </nav>
  <main class="h-64 bg-gray-100 flex justify-center pt-10 text-xl">App Here</main>
</template>

<script setup lang="jsx">
// The script remains the same as above
</script>
Key Takeaways:
v-bindUsage: Attach multiple properties to elements simultaneously, keeping the template clean.- Unique Keys: Use the
keyattribute to prevent rendering issues during dynamic updates. - Dynamic Components: Utilize Vue’s dynamic components to render different elements based on data.
- Event Binding: Attach events like
@clickdynamically based on data properties. - Component Modularity: Break down components further and import them as needed for better scalability.
By following this approach, you create a dynamic and flexible horizontal navbar that’s easy to extend or modify. This method not only saves time and effort but also ensures your codebase remains clean and maintainable.
Enhancing Flexibility with Vue JSX
Vue JSX allows developers to write Vue components using a syntax similar to React’s JSX, offering greater flexibility and expressiveness. Unlike Vue’s typical template-based approach, JSX allows you to embed HTML-like elements directly inside JavaScript logic. This is particularly useful in dynamic layouts where you need to generate or manipulate UI elements based on dynamic data.
Instead of separating logic and markup across different sections of the component (template and script), JSX enables you to manage both in one cohesive block of code.
In our solution, JSX helps simplify how we dynamically render components like the Avatar or conditional elements such as the “Add Funds” button.
For example, instead of hardcoding these elements into a template, we can dynamically generate them using a render function in JavaScript.
This allows us to update components like the navbar with real-time data, such as user authentication status, without duplicating code or scattering logic across the template and script sections.
By using JSX, we maintain cleaner, more maintainable code, while still leveraging Vue’s reactivity and flexibility.
Next Steps
Now that we understand dynamic layouts, it’s time to put your knowledge into practice. Here are some suggested next steps:
- Refactor Existing Projects: Identify and refactor parts of your current projects where dynamic layouts can enhance efficiency and readability, especially in areas with repetitive HTML or component logic.
- Integrate with CMS: Experiment with integrating a CMS or other systems with your dynamic layouts to create even more dynamic and responsive user interfaces.
- Collaborate with Your Team: Share your insights on dynamic layouts with your team. Discuss how you can collectively leverage dynamic layouts in your projects to boost productivity and foster a culture of continuous improvement.
- Explore Advanced Use Cases: Continue exploring more advanced applications of dynamic layouts. Mastery comes from consistent practice and exploration.
By taking these steps, you’re well on your way to becoming proficient in dynamic layouts. For an even smoother experience in creating dynamic interfaces, check out our course on Easy Interfaces with Vuetify, the popular component library for Vue.js developers.
By embracing dynamic layouts, you can streamline your development process, enhance your application’s flexibility, and maintain a cleaner, more maintainable codebase. Start integrating dynamic layouts into your projects today and experience the transformative impact on your workflow and application quality.